Your Cart (0)
Your cart is empty
Free express shipping
Drawer menu
Free express shipping

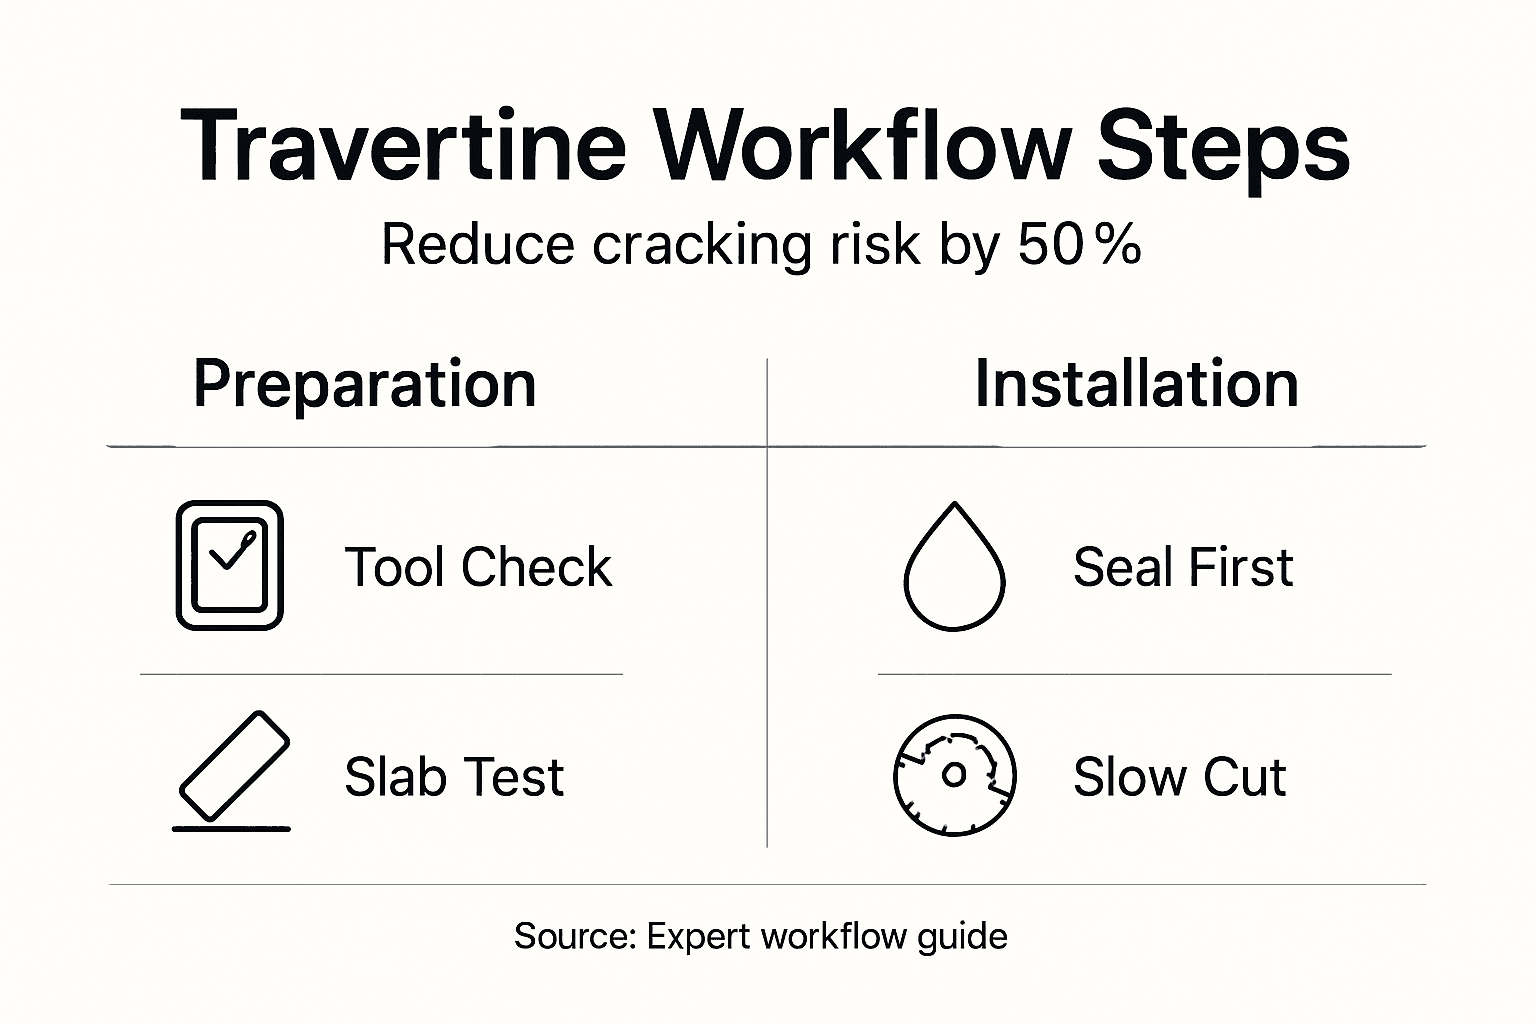
Luxury travertine installations fail when designers skip critical surface preparation steps. Surface irregularities exceeding 2 mm double the risk of stone cracking, ruining both aesthetics and durability in high-end projects. This workflow covers specialized tools, precise installation techniques, advanced sealing methods, and maintenance protocols that ensure your travertine decor delivers the premium results luxury clients expect.
| Point | Details |
|---|---|
| Proper tools reduce chipping by 25% | Diamond blade saws and specialized trowels minimize damage during cutting and setting |
| Surface flatness within 2 mm cuts cracking risk 50% | Precise leveling before installation prevents stress fractures and premature failure |
| Recurring sealing extends lifespan 15-20 years | Resealing every 1-3 years maintains protection and preserves luxury appearance |
| Nanotech sealants offer 80% better stain resistance | Advanced formulations cost 15-25% more but reduce maintenance frequency by half |
| 48-hour curing halves post-install damage risk | Allowing proper set time prevents chips, loosening, and surface irregularities |
Acquiring the right travertine installation tools transforms your workflow from risky guesswork to controlled precision. Every luxury installation demands specialized equipment that protects both the stone and the installer.
Start with diamond blade wet saws designed for natural stone. Standard tile cutters create microfractures that compromise structural integrity. Add professional-grade stone sealants, notched trowels sized for your stone thickness, and dedicated mixing equipment for thinset mortar. Essential preparatory tools for travertine decor installation include stone saw, diamond blades, sealants, trowels, and protective gear. Safety equipment matters equally: respirators rated N95 or higher, cut-resistant gloves, and eye protection prevent silica dust exposure and handling injuries.
Workspace conditions directly affect stone stability. Maintain humidity between 40-60% and temperatures of 60-75°F during storage and installation. Extreme conditions cause expansion or contraction that leads to cracking. Store slabs vertically on padded racks, never flat stacked, to prevent warping.
Travertine grades vary significantly in density and porosity. Premium grades exhibit consistent coloring, minimal voids, and uniform thickness. Honed finishes work best for floors due to slip resistance, while polished surfaces suit decorative accents and vertical applications. Filled travertine requires different handling than unfilled varieties because resin-filled voids behave differently under stress.
Pro Tip: Test cut a small piece from each slab before starting your project. This reveals hidden fractures and verifies your blade speed settings without risking expensive centerpiece stones.
Handle slabs with suction cup lifters rated for 150% of stone weight. Manual lifting creates pressure points that crack travertine edges. During cutting, support the entire slab on both sides of the blade path. Never let cut pieces drop or twist while still partially attached.
| Tool Category | Specific Requirements | Purpose |
|---|---|---|
| Cutting | Diamond blade wet saw, 10-inch minimum | Clean cuts without chipping |
| Setting | Notched trowel, 1/2-inch square notch | Even mortar distribution |
| Sealing | Penetrating stone sealer, roller applicator | Deep protection without surface film |
| Safety | N95 respirator, cut gloves, safety glasses | Dust and injury prevention |
| Measuring | Laser level, 1/16-inch accuracy | Surface flatness verification |
Choosing premium travertine separates luxury installations from mediocre results. Inspect each slab for color consistency across the surface. Variations exceeding 15% create patchy appearances that clash with high-end design standards. Check porosity by placing water drops on unfinished areas. Absorption within 30 seconds indicates excessive porosity requiring extra sealing steps.
Finish selection impacts both aesthetics and maintenance requirements. Polished travertine delivers mirror-like surfaces ideal for statement pieces and low-traffic decorative elements. The smooth surface resists staining but shows scratches more readily. Honed finishes provide subtle elegance with better slip resistance for flooring applications. Tumbled travertine offers rustic texture suited for accent walls but requires more frequent sealing due to increased surface area.
Pre-seal all travertine before installation. This critical step prevents thinset mortar from penetrating stone pores and causing permanent discoloration. Apply penetrating sealer 24 hours before setting, allowing complete absorption. Wipe excess from surfaces after 15 minutes to prevent hazing.
Pro Tip: Explore travertine decor inspiration to understand how finish choices affect overall design impact and maintenance considerations in completed luxury spaces.
Transport protection matters as much as installation technique. Wrap individual pieces in foam padding, securing with non-abrasive straps. Never transport stones loose in vehicles where vibration causes edge chips. Stack vertically with spacers between pieces to prevent surface scratches.
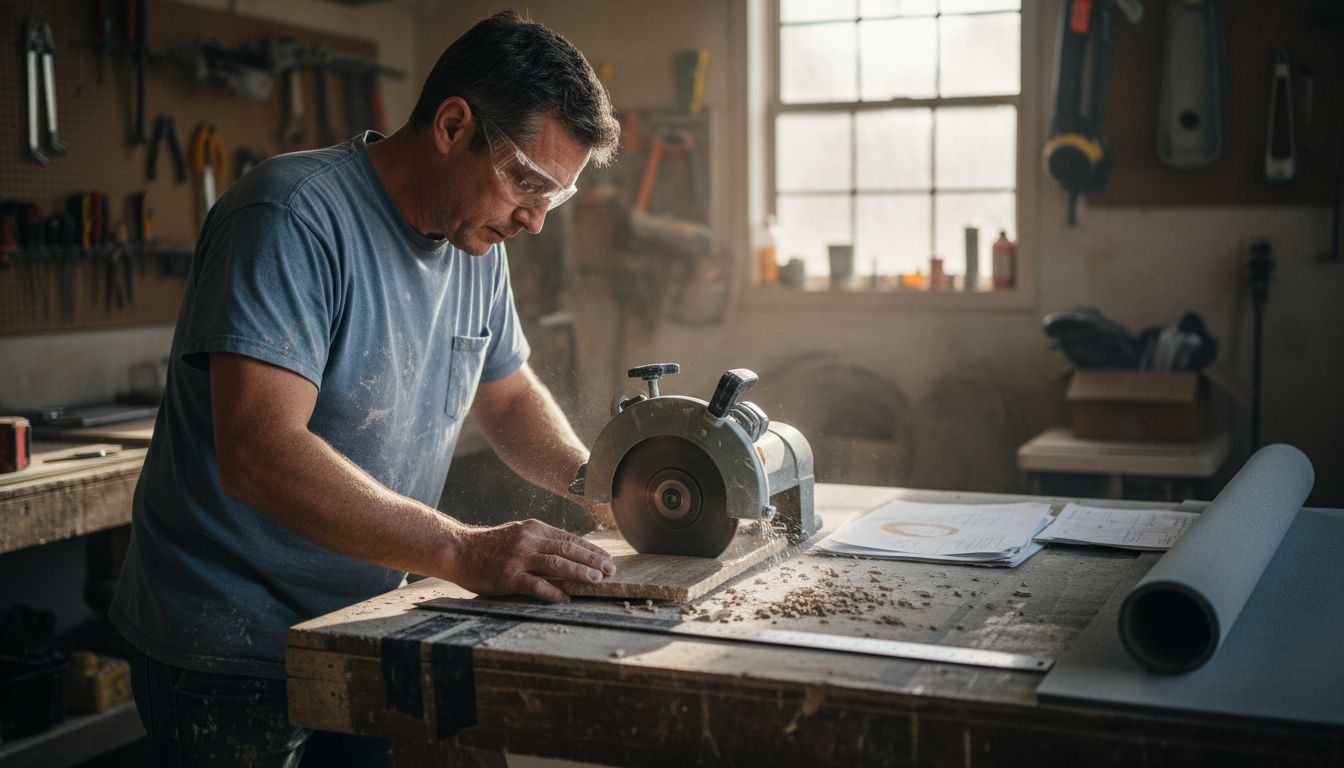
Cutting technique determines edge quality. Set blade depth 1/8 inch beyond stone thickness. Feed material slowly at consistent speed, letting the blade do the work. Rushing creates heat buildup that causes internal fractures invisible until after installation. Keep blades wet throughout cutting to control dust and reduce friction.
Surface preparation determines installation success more than any other factor. Start by verifying flatness using a 6-foot straight edge and feeler gauges. Any deviation exceeding 2 mm across the installation area requires correction through grinding or self-leveling compound. This step alone reduces cracking risk by 50%.
Clean surfaces thoroughly, removing all dust, oils, and debris. Even thin contamination layers prevent proper mortar bonding. Use degreasing agents on areas where handling oils may have transferred. Rinse completely and allow drying for 4-6 hours before proceeding.
Mark layout lines using laser levels for precision alignment. Dry-lay all pieces to verify fit and pattern flow before mixing mortar.
Mix thinset mortar to manufacturer specifications using clean water and a paddle mixer. Consistency should resemble creamy peanut butter without lumps. Let mortar slake for 10 minutes, then remix before application.
Apply mortar using notched trowel held at 45-degree angle. Create uniform ridges covering 100% of the substrate area. Work in sections no larger than you can set within 15 minutes to prevent skinning.
Set stones firmly into mortar using twisting motion to achieve full contact. Check for hollow spots by tapping surface. Hollow sounds indicate voids requiring piece removal and fresh mortar application.
Maintain consistent joint spacing using calibrated spacers. Joints between 1/16 and 1/8 inch work best for luxury installations, providing clean lines without excessive grout visibility.
| Installation Phase | Duration | Critical Success Factor |
|---|---|---|
| Surface preparation | 4-8 hours | Flatness within 2 mm tolerance |
| Layout and dry fit | 2-4 hours | Pattern verification before commitment |
| Mortar application and setting | 6-12 hours | Complete coverage without voids |
| Initial cure | 24 hours | No traffic or stress on installation |
| Final sealing | 2-3 hours | Even coverage with proper absorption time |
Allow 24 hours before grouting and 48 hours before allowing foot traffic. Premature use causes micro-movements that crack grout lines and loosen stones. This travertine installation and maintenance workflow patience prevents failures that require expensive repairs.
Apply final sealer after complete curing. Use penetrating formulas that absorb deeply rather than surface coatings that peel or yellow. Apply two coats 4 hours apart, wiping excess after each application. Full protection develops over 72 hours as sealer cures within the stone matrix.
Protecting your travertine investment requires understanding stone chemistry. Travertine contains calcium carbonate that reacts destructively with acids and strong alkalines. This means common household cleaners cause permanent damage through chemical etching.
Use only pH-neutral cleaners specifically formulated for natural stone. These products clean effectively without dissolving calcium compounds or stripping protective sealers. Mix according to label directions and never exceed recommended concentrations. Stronger solutions do not clean better but do increase damage risk.
Daily maintenance involves dry dust mopping or vacuuming with soft brush attachments. Weekly damp mopping uses diluted stone cleaner applied with microfiber mops. Avoid excessive water that seeps into joints and undermines installation integrity.
Resealing schedules depend on traffic levels and exposure conditions. High-traffic areas require annual resealing. Moderate-use spaces need attention every 18-24 months. Protected decorative pieces may extend to 36 months between applications. The travertine decor maintenance guide provides detailed schedules based on specific applications.
Pro Tip: Test sealer effectiveness by placing water drops on the surface. If water beads and sits for 5+ minutes, protection remains adequate. Immediate absorption signals time for resealing.
Polished finishes eventually lose their shine through normal wear. Professional repolishing every 3-5 years restores mirror surfaces using diamond abrasive pads in progressive grits. This service costs considerably less than replacement while maintaining luxury appearance.
Immediate spill cleanup prevents staining. Blot liquids rather than wiping to avoid spreading. Acidic substances like wine, citrus juice, or vinegar require immediate neutralization with baking soda paste before cleaning. Oil-based stains need poultice treatment using absorbent powder mixed with appropriate solvents.
Installation failures stem from predictable errors that careful planning prevents. Understanding these pitfalls helps you avoid costly corrections and client disappointment.
Uneven surface preparation and improper thinset application lead to stone cracking and installation failure. Surface irregularities create stress concentration points where normal loads cause fractures. The fix requires complete removal and reinstallation after proper leveling. Prevention through initial diligence saves thousands in repair costs.
Skipping pre-sealing or delaying resealing applications allows stains to penetrate deeply into porous stone. Surface cleaning cannot remove absorbed contaminants. Professional restoration using poultices and refinishing becomes necessary. Strict adherence to sealing schedules prevents this expensive scenario.
Acidic cleaning products cause immediate and permanent damage. Etching appears as dull spots or rough patches where calcium carbonate dissolved. No simple fix exists beyond professional refinishing or piece replacement. Education of maintenance staff prevents this common and entirely avoidable problem. Provide approved cleaning products and explicit instructions about prohibited substances.
Premature traffic on fresh installations causes multiple failures. Foot traffic within 48 hours shifts stones before mortar fully cures, creating lippage and loose pieces. Heavy furniture placement compounds the problem by concentrating stress. Enforce strict traffic restrictions using barriers and clear signage. The travertine troubleshooting tips cover timing requirements that prevent these issues.
Incorrect thinset coverage creates voids beneath stones. Tapping reveals hollow sounds indicating air pockets. These weak points concentrate stress and lead to cracking under normal use. Proper trowel technique with full coverage ensures uniform support across entire stone backs.
Modern sealing technology offers performance improvements over traditional formulations but requires understanding tradeoffs. Nanotech sealers offer up to 80% better stain resistance with a 15-25% higher cost but reduce maintenance frequency by half. These advanced products penetrate deeper and create stronger molecular bonds within stone structures.
Nanotechnology-based sealants work by filling microscopic pores with particles 1000 times smaller than conventional sealers. This creates superior protection against water and oil-based stains while maintaining stone breathability. The nanotechnology sealers for travertine higher initial cost spreads across extended protection periods, often proving more economical over 5-year timelines.
Traditional sealers cost less upfront and work adequately for protected low-traffic applications. They require more frequent reapplication and offer reduced stain protection. For luxury installations where appearance matters critically, the performance gap justifies premium sealer investment.
| Feature | Traditional Sealers | Nanotechnology Sealers |
|---|---|---|
| Initial cost | Baseline | 15-25% higher |
| Stain resistance | Moderate | 80% better |
| Resealing frequency | 12-18 months | 24-36 months |
| Penetration depth | Surface level | Deep molecular bonding |
| Breathability | Good | Excellent |
Finish selection presents appearance versus maintenance tradeoffs. Polished travertine delivers striking visual impact with reflective surfaces that showcase stone veining. However, scratches show prominently and require periodic professional refinishing. Daily maintenance needs careful attention to prevent damage.
Honed finishes provide sophisticated matte appearance with better scratch resistance and easier maintenance. The subtle surface texture hides minor wear while delivering timeless elegance. For high-traffic luxury applications, honed finishes often prove more practical without sacrificing design quality.
Dust mitigation during installation protects both workers and surrounding spaces. Wet cutting eliminates 95% of airborne silica but creates slurry requiring containment and disposal. Dry cutting with vacuum systems captures dust at the source but demands specialized equipment. Budget for proper dust control to maintain healthy work environments and prevent cleanup complications.
Realistic timeline planning prevents rushed work that compromises quality. Typical luxury travertine installations require 3-7 days from surface preparation through final curing. Small accent pieces may complete faster, while extensive floor installations need extended schedules.
Day 1 focuses on surface preparation, leveling, and layout verification. Rushing this phase causes downstream failures. Day 2 involves cutting, pre-sealing, and beginning installation of major sections. Days 3-4 complete stone setting with careful attention to pattern flow and joint consistency. Days 5-6 allow initial curing before grouting. Day 7 includes final sealing and project cleanup.
Maintenance costs drop significantly when using advanced protection systems. Traditional approaches require annual professional resealing at $2-4 per square foot. Nanotech sealers reduce frequency by half, cutting long-term costs by 40% while delivering superior protection. Factor these savings into material selection decisions.
Lifespan expectations for properly installed and maintained travertine reach 15-20 years before requiring major restoration. This extended durability justifies premium material costs in luxury settings. Installations following this workflow maintain appearance and structural integrity far beyond budget alternatives.
Success metrics provide objective quality benchmarks. Zero cracking or chipping within the first 5 years indicates proper installation technique. Annual discoloration below 5% demonstrates effective sealing and maintenance. Client satisfaction remains high when installations meet these performance standards while delivering the aesthetic impact luxury designs demand.
Transforming this technical knowledge into stunning reality requires access to premium materials and expert guidance. Marmorique specializes in high-quality travertine and marble decor crafted specifically for luxury interior applications. Our curated collection includes lamps, tables, bathroom sets, and decorative accessories that showcase natural stone beauty.

Every piece reflects meticulous craftsmanship and timeless design principles that elevate residential and commercial spaces. Whether you’re sourcing statement furniture or planning comprehensive interior transformations, our selection delivers the quality your projects demand. Explore marble furnishings for luxury interiors to discover how premium natural stone creates lasting impressions.
Understanding material origins ensures informed selection decisions. Learn about travertine origins and quality factors that distinguish exceptional stone from ordinary alternatives. Our blog provides ongoing education about natural stone decor solutions tailored for discerning designers.
Connect with our team for personalized consultations that match your specific project requirements with ideal stone selections.
High-traffic installations require annual resealing to maintain protection and appearance. Water bead testing every 6 months helps identify when protection weakens before damage occurs.
pH-neutral cleaners specifically formulated for natural stone provide safe and effective cleaning. Avoid all acidic products including vinegar, lemon juice, and standard household cleaners that cause permanent etching.
Allow 48 hours of complete curing before permitting foot traffic on newly installed travertine. Full sealer effectiveness develops over 72 hours as chemical bonds form within the stone matrix.
Etching that appears as dull spots, cracks wider than hairline thickness, hollow sounds when tapping, or persistent stains after proper cleaning all indicate damage needing professional assessment. Early intervention prevents minor issues from becoming expensive failures.
Nanotechnology sealers work effectively on polished, honed, and tumbled travertine finishes. The microscopic particles penetrate all surface textures, though application technique varies slightly between finish types for optimal absorption.


