Your Cart (0)
Your cart is empty
Free express shipping

Drawer menu
Free express shipping

Transforming your bathroom into a luxurious retreat requires more than just selecting beautiful materials. Many homeowners and designers struggle with common layout and tile placement mistakes that undermine even the most premium stone selections. This comprehensive guide walks you through the essential steps to master marble and travertine styling, from initial planning through long-term maintenance. You’ll discover how to avoid costly errors, execute flawless installations, and create a bathroom that exudes timeless European elegance with natural stone beauty.
| Point | Details |
|---|---|
| Plan layout carefully | Strategic planning prevents storage shortages and awkward fixture placement that compromise functionality |
| Choose stone wisely | Marble offers classic veining while travertine provides warm texture, both requiring proper sealing for bathroom durability |
| Install with precision | Consistent grout lines, suspended mirrors, and pedestal sinks create the coveted luxury aesthetic |
| Maintain properly | pH-neutral cleaners and periodic resealing preserve stone beauty and protect your investment |
| Integrate smart storage | Built-in solutions like recessed niches maintain clean lines without sacrificing practicality |
Before you purchase a single slab of marble or travertine, take time to evaluate your existing bathroom layout with a critical eye. Bathroom design involves countless micro-decisions that collectively determine whether your space feels cramped and chaotic or spacious and serene. Walk through your current bathroom and identify problem areas: insufficient counter space, poor lighting zones, awkward traffic flow, or moisture-prone corners.
Common mistakes that sabotage bathroom functionality include neglecting adequate storage, placing tiles without considering visual flow, and failing to account for water splash zones. Your stone bathroom aesthetics guide should address these fundamental issues before focusing on surface beauty. Start by documenting your must-have features and measuring every dimension accurately.
Key requirements for successful stone integration include proper lighting that showcases veining patterns, robust ventilation to prevent moisture damage, waterproof barriers behind stone surfaces, and clear traffic paths that prevent bottlenecks during morning routines. Consider how natural light enters your space and where shadows fall throughout the day. Think about electrical outlet placement for heated towel racks and grooming tools.
Plan your luxury stone integration by sketching multiple layout options on graph paper or using digital design tools. Test different configurations for vanities, showers, and accent walls. Visualize how marble or travertine will interact with existing fixtures and architectural features. This preparatory work prevents expensive mid-project changes and ensures your stone investment delivers maximum visual impact.
Pro Tip: Create a physical mood board with actual stone samples, grout colors, fixture finishes, and paint chips. View these materials together under your bathroom’s lighting conditions at different times of day to see how colors and textures truly interact before making final selections.
Essential planning checklist:
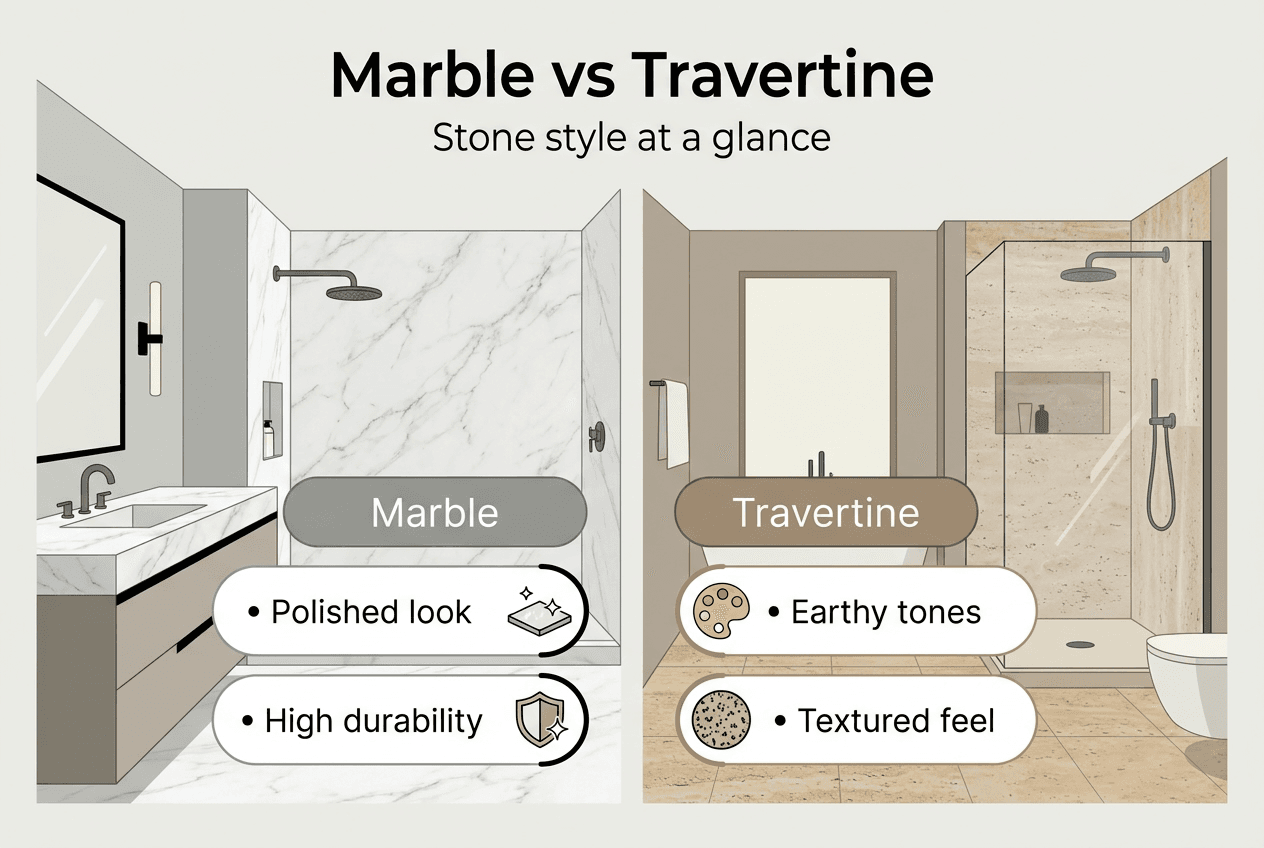
Selecting between marble and travertine represents one of your most important design decisions, as each stone brings distinct visual character and practical considerations to your bathroom. Marble delivers the classic luxury aesthetic with dramatic veining patterns that create natural artwork across walls and floors. Its polished surface reflects light beautifully, making smaller bathrooms feel more spacious and luminous. Popular varieties like Carrara, Calacatta, and Statuario offer varying vein densities and background tones from pure white to warm cream.
Travertine provides an entirely different sensory experience with its naturally pitted surface and earthy color palette. This stone’s texture adds dimensional interest and a tactile quality that marble’s smooth finish cannot replicate. The warm beiges, tans, and golds in travertine create a spa-like atmosphere that feels organic and grounding. Its subtle color variations ensure each installation is unique while maintaining visual cohesion.

Both stones require proper sealing with penetrating products designed specifically for natural stone in wet environments. Marble’s density makes it slightly less porous than travertine, but both need protection against moisture penetration and staining from toiletries. Quality sealers create an invisible barrier that repels water while allowing the stone to breathe, preventing trapped moisture that could cause deterioration.
Stone comparison for bathroom applications:
| Feature | Marble | Travertine |
|---|---|---|
| Durability | High density resists scratching | Moderate density, more prone to surface wear |
| Maintenance | Requires sealing every 6-12 months | Needs sealing every 3-6 months due to porosity |
| Cost range | $40-200+ per square foot installed | $25-80 per square foot installed |
| Aesthetic | Bold veining, polished elegance | Subtle texture, organic warmth |
| Water resistance | Good when properly sealed | Moderate, requires diligent sealing |
| Slip resistance | Low when polished, better when honed | Naturally higher due to textured surface |
Your choice between these stone styling options should align with your design vision, maintenance commitment, and budget constraints. Marble suits contemporary and traditional aesthetics equally well, while travertine leans toward Mediterranean, rustic, or spa-inspired designs. Consider mixing both stones strategically: marble for vanity tops and feature walls where its drama shines, travertine for shower floors where its slip resistance adds safety.
Pro Tip: Request sealed and unsealed samples from your stone supplier. Pour water on both surfaces to observe how quickly unsealed stone absorbs moisture versus how sealed stone repels it. This demonstration reinforces the critical importance of proper sealing and helps you understand your maintenance commitment.
Key selection factors:
Successful stone installation begins with a detailed layout plan that aligns every stone placement with your bathroom’s architectural features and fixture locations. Start by establishing your focal point, typically the vanity wall or a dramatic shower enclosure, then work outward to secondary surfaces. This approach ensures your most impressive stone pieces command attention while supporting elements enhance without competing.
Use consistent grout colors that either blend seamlessly with your stone for a monolithic look or provide subtle contrast to define each piece. Grout width matters tremendously: narrow joints (1/8 inch) create sleek, modern aesthetics while wider joints (1/4 inch or more) suit rustic or traditional designs. Precision in grout application prevents the amateur appearance of uneven lines and inconsistent spacing that undermine bathroom functionality.
Incorporate European-inspired design elements like suspended mirrors that appear to float against stone walls, creating visual lightness that balances stone’s substantial presence. Pedestal sinks maximize floor visibility, showcasing beautiful stone flooring while maintaining the open, uncluttered aesthetic that defines luxury bathrooms. Wall-mounted faucets eliminate counter clutter and allow stone surfaces to shine without interruption.
Step-by-step installation sequence:
Storage solutions must integrate seamlessly into your stone design rather than appearing as afterthoughts. Recessed niches carved into shower walls provide practical storage while showcasing your stone selection. Consider IKEA Pax systems adapted for bathroom use, offering customizable storage that maintains clean lines. Built-in medicine cabinets behind mirrors preserve wall space while keeping counters clear.
Pay special attention to stone bathroom durability by ensuring proper support for heavy stone installations. Vanity tops require solid substrate and adequate bracing. Wall-mounted stone requires appropriate anchoring systems rated for the weight. Floors need structurally sound subflooring that won’t flex under stone’s mass.
Critical installation checks:
Common mistakes to avoid:
Preserving your stone bathroom’s beauty requires consistent maintenance routines that protect against moisture damage, staining, and surface wear. Regular cleaning with pH-neutral products specifically formulated for natural stone prevents the gradual dulling and etching that harsh chemicals cause. Avoid acidic cleaners like vinegar or lemon-based products that react with calcium carbonate in marble and travertine, creating permanent dull spots and surface pitting.
Specialized penetrating sealers form your primary defense against water infiltration and staining. These products require reapplication on schedules determined by your stone type, finish, and exposure to water. Polished marble typically needs sealing every 6 to 12 months, while more porous travertine benefits from sealing every 3 to 6 months. Shower areas with constant water exposure need more frequent attention than vanity surfaces.
Storage planning remains critical for maintaining your stone bathroom’s pristine appearance. Cluttered counters collect moisture, soap residue, and product spills that can stain or etch stone surfaces. Implement organizational systems that keep toiletries contained and surfaces clear. Use trays or dishes to corral frequently used items, preventing direct contact between bottles and stone.
Daily maintenance takes just minutes but prevents problems that require expensive professional restoration. Wipe down shower walls after each use to prevent hard water deposits and soap scum buildup. Squeegee glass and stone surfaces to eliminate standing water. Address spills immediately, especially from acidic substances like toothpaste, cosmetics, or hair products that can etch or stain.
Pro Tip: Keep a spray bottle of pH-neutral stone cleaner and a microfiber cloth in your bathroom for quick daily wipe-downs. This effortless habit prevents the gradual buildup that requires aggressive cleaning and potential stone damage.
Essential maintenance practices:
Products and tools to avoid:
Consult expert stone maintenance resources when you encounter stubborn stains or damage beyond routine care. Professional stone restoration specialists can hone, polish, or repair damaged areas, returning your luxury stone bathroom to its original glory. Many issues that appear permanent to homeowners are completely reversible with proper professional intervention.
Your beautifully styled stone bathroom deserves equally refined accessories that complement its luxury aesthetic. Thoughtfully selected marble accents create visual continuity while adding functional elegance to everyday routines. These finishing touches transform a well-designed bathroom into an immersive sensory experience.
Marmorique offers handcrafted stone accessories that harmonize perfectly with premium marble and travertine installations. Consider an artisan marble soap dish that brings tactile luxury to your vanity while protecting stone counters from soap residue. Each piece showcases natural stone’s inherent beauty through expert craftsmanship.
Decorative elements like an artisan marble grape ornament add sculptural interest to open shelving or window sills, creating focal points that celebrate stone’s artistic potential. These solid stone accents provide weight and substance that elevate your bathroom beyond typical decor. They remind you daily of the timeless elegance that drew you to natural stone in the first place.
Sealing frequency depends on stone type and water exposure. Marble typically requires sealing every 6 to 12 months, while travertine needs attention every 3 to 6 months. Shower areas with constant moisture exposure benefit from more frequent sealing than vanity surfaces. Test your sealer’s effectiveness quarterly by sprinkling water on the stone; if water absorbs rather than beading up, reseal immediately.
DIY installation is possible for experienced renovators with proper tools and knowledge of stone handling. However, professional installation ensures proper waterproofing, substrate preparation, and precision cutting that prevents costly mistakes. Stone’s weight, fragility during cutting, and need for specialized thin-set mortar make professional installation worthwhile for most homeowners. Consider hiring professionals for complex layouts or large format tiles while tackling simpler projects like accent walls yourself.
Recessed niches carved into shower walls provide practical storage while showcasing your stone selection beautifully. Wall-mounted cabinets and floating vanities maximize floor visibility, allowing stone flooring to shine. Consider customizable systems like IKEA Pax adapted for bathrooms, offering organized storage that maintains clean lines. Built-in medicine cabinets behind mirrors preserve wall space while keeping counters clear and protecting stone from product spills.
Use only pH-neutral cleaners specifically formulated for natural stone to prevent etching and dulling. Avoid acidic products like vinegar, lemon juice, or typical bathroom cleaners containing harsh chemicals. Never use abrasive scrubbers, bleach, or ammonia-based products that damage sealers and stone surfaces. Microfiber cloths with stone-safe cleaners provide effective cleaning without scratching. Many stone suppliers offer their own cleaning product lines designed for optimal safety and performance.
Start with thorough planning that addresses storage, lighting, ventilation, and traffic flow before selecting stone. Create detailed layouts on paper or digitally, testing multiple configurations. Use physical samples to visualize how stones interact with lighting and existing features. Avoid rushing decisions or skipping waterproofing steps. Plan adequate storage to prevent counter clutter that detracts from stone beauty. Consult design professionals when facing complex layout challenges or structural concerns.
Absolutely, when used strategically. Light-colored stones like white Carrara marble or cream travertine reflect light and create spaciousness in compact areas. Large format tiles minimize grout lines for a cleaner, more expansive look. Use stone on focal walls rather than every surface to prevent overwhelming small spaces. Pair stone with glass shower enclosures and wall-mounted fixtures to maintain openness while enjoying luxury materials.


